Thursday, April 8, 2010
Container gardening
Seeds are sprouting! It's very exciting!
The orange buckets holds a strawberry plant in a self watering container. I only have to add water through the pipe once a week!
In the pots are thyme and parsley that hung in there and endoured winter indoors and decided to come back this spring.
In the long blue container are my lettuce sprouts!
The milk crate concoction is my attempt to utilize what I had for container growing and so far it is working. I put rocks in the bottom of the milk crate, placed a (biodegradable) garbage bag inside the crate and poked a bunch of holes in it, filled it with organic potting mix and topped it off with my very own compost. I planted peas in it and I am hoping they will climb up the bars on the window..already the seeds are beginning to sprout as of today!
My seeds indoors have sprouted as well, except for the ones in the egg cartons..not sure if those are going to work or not. The ones in the little pots are doing great though! I'm going to have tons of cilantro hopefully!
I got ideas for container gardening from a book called The Urban Homesteader (your guide to self-sufficient living in the heart of the city) by kelly coyne and erik knutzen...
Next up..chickens....:)
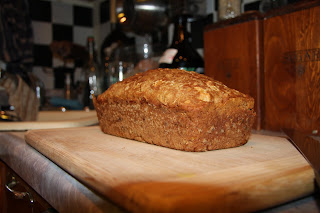
Cheesy beer bread
Beer bread is probably the easiest, tastiest bread you could ever make. You can add whatever you want to this basic recipe:
3 cups of flour (I used half whole wheat and half bread flour)
1 T baking powder
1 T sugar (or honey)
1 t salt
14 oz beer
I also added dubliner stout cheese and romano cheese
red pepper flake
worsetershire sauce
a bit of whiskey for good measure
and some coffee because I drank some of the beer and needed more liquid
Rob has been raving about this bread for 2 days now. I happen to think it is pretty awesome myself. First we just ate it with butter, last night we made grilled cheese with it. YUM!
I don't think this will be on any school menu's, but it should, because it's so easy!
Saturday, March 27, 2010
Grilled vegetables
Tis the season for grilling! Use that grill for something other than hot dogs and burgers for a change and grill an assortment of vegetables like this one. I cut up potatoes, onions, beets, carrots and rutabegas, tossed them in a bowl with olive oil, salt and pepper, thyme and rosemary. Then make an aluminum foil patch for the vegetables to go into and place the pouch on a hot grill to cook for 30 minutes or so. When they are ready, they will have a nice smoky flavor you can get anywhere else besides your grill!
Gardening season has begun!
So it's the end of March and this is my gardening update:
Seeds are started..I've got egg cartons full of cilantro, basil, cherry tomatoes, yellow tomatoes, and roma tomatoes (hopefully to make lots of sauce from!)
Spinach is planted in the backyard...
And at the community garden, the winter cover crops have been turned over and turnips went in the ground today!
I love spring!
More pictures to follow!
Thursday, March 18, 2010
Sunday, March 14, 2010
Clam Chowdah
The story behind this "chowdah" as they say in RI, comes from my days of working as a cook at the Rhode Island School of Design. One of my favorite places I've ever worked I might add. During the summer, RISD entered a clam chowder contest in Newport, RI. If you ever get the chance to visit RI, I highly recommend Newport. The big houses along the beach are nice, the bridge taking you into Newport from Providence is pretty cool, the sailboats are a nice sight to see, but the clams, they are amazing. You have to eat at a little clam shack called Flo's, across the street from the main beach in Newport. There are 3 things you must try:
1. Stuffed fiery quahogs
2. The $5 special - Bowl of clam chowder, clam cakes and a cup of beer.
3. The $50 special - 2 hots dogs and a bottle of champagne! (I am going to do this someday when I go back!)
Back to my RISD story - we entered a clam chowder cook off and although we didn't win with our aurora chowdah, the day was a blast! This isn't exactly RISD's recipe, but it is similar and delicious!
2 strips bacon, diced
1 small onion, diced
2 medium sized yukon gold potatoes - diced
2 dozen clams, steamed, juices reserved, clams chopped
1 can diced tomatoes
thyme, salt and pepper to taste
milk - about 2 cups
heavy cream - about 1 cup
1. Saute bacon in stock pot until cooked through. Add 1 tsp butter if needed. Then saute onion until soft. Add potatoes, milk and seasonings.
2. Simmer until potatoes are soft, then mash potatoes a bit with a fork.
3. Add clam juice and chopped clams, diced tomatoes and heavy cream. Simmer for a few minutes longder, do not let boil. Taste, adjust seasonings.
Wednesday, March 10, 2010
Homemade biscuits and apple jam
The inspiration to make apple jam came when a friend requested some more fig jam that I made last September. I only had a bit left, so we decided to make apple jam, because apples are so plentiful right now.
Jam making is actually pretty simple. I have yet to find any pectin in my Brooklyn neighborhood, so instead I've made jam twice without it. Time works just fine as the thickener.
We used a variety of apples, about 10 total. Peel, core and cut them into small pieces. Add juice from 1 lemon, a cup or so of sugar, 1 T. fresh grated ginger, 2 t cinnamon, a few dashes of nutmeg and a teaspoon of freshly ground cloves. Add everything to a large pot and cook on low heat until the desired consistency is reached. Add water if needed, although I don't think you are "supposed to", but we did.
Jarring:
Sanitize ball jars (a dishwasher is usually recommended)
Bring lids to boil in water, turn off heat, cover.
Heat jars in the oven.
Ladle jam into hot jar, wipe rim clean. Place lids on jar (use tongs to remove from the hot water). Turn jars upside down and let cool.
What better pairing with jam than homemade biscuits? I used a simple drop biscuit recipe, becasue I don't have biscuit cutters, although I have used cookie cutters in the past..heart shaped to be exact.
Buttermilk Biscuit recipe: (adapted from the Better Homes and Gardens Cookbook)
3 cups all purpose flour
4 teaspoons baking powder
1 T sugar
1 t salt
3/4 t cream of tartar
1/2 cup butter and 1/4 cup shortening
1 1/4 cups buttermilk (I didn't have buttermilk, so I made/used sour milk - just pour a T vinegar in a measuring cup and then fill it up the rest of the way with milk. Let sit for 5 minutes before adding it to the other ingredients)
1/4 cup heavy cream
Stir together dr ingredients. Cut butter and shortening into flour mixture. Add buttermilk all at once, stir with a fork until just moistened. Don't knead or anything, just drop dough by the spoonful onto a greased baking sheet. Bake at 450 degrees F for about 10 minutes. Eat immediately!
Just realized we were too busy drinking wine while making the apple jam to take any pictures of the process! We will just have to make it again! darn!
Baked cod with smashed potatoes and roasted balsamic asparagus
One of the many great things about living on the coast is the abundance of fresh seafood. The fish stand at the farmer's market I go to every week always has a great selection of fresh fish. I grew up eating lake fish, mostly catfish, so I've had to learn to get used to some new types of fish. Skate and hake are two good ones, as is the commonly known cod fish. I paired the fish with smashed potatoes, (yes smashed, not mashed, because I didn't peel them) and roasted asparagus (I know, I know it's not in season!). This meal was inspired by a friend's meal at the Brooklyn Public House a couple weekends ago.
To cook the asparagus, break off the tough ends wherever it breaks easily when pressed. Peel the ends. Steam until tender, shock in ice water (blanch). Toss with olive oil, lemon juice and balsamic vinegar. Season with salt and pepper and roast for about 12 minutes at 350 degrees F.
Bake Cod:
Juice of 1 lemon
sauteed mushrooms
1 T vinegar
drizzle of olive oil
salt and pepper to taste
bake at 350 degrees F
Finishe dwhen fish turns from opaque to white
Smashed potatoes - no directions here..you know what to do!
Friday, February 26, 2010
Vegetable Quiche
Quiche is the perfect weekday dinner. It's simple, you can put whatever you want in it, and it's delicious. I used one of the frozen pie crusts I made a couple days before and thawed it out while I was at work. I used an assortment of vegetables, my favorites are spinach and mushrooms, but I also added caramelized onions and another green leafy vegetable identified at the farmer's market as "spicy mix". The Chinese lady who sells it has yet to give me any more information about it. A quick google search says that spicy mix is some singer in India..wait, what? I'll just go with my instinct and refer to it as a micro green....
I sauteed one small onion in butter, then added fresh spinach and my spicy mix. Cook the greens until wilted, season with salt and pepper. I sauteed my mushrooms separately (in more butter), to make sure they got nice and browned. As Julie said in Julie and Julia, the secret to cooking mushrooms is to give them their space. Also, covering the pan and letting the mushrooms release all of their moisture, and then sauteing a little longer to allow them to brown works nicely too.
For the egg mixture, beat together 4 farm fresh eggs, add 1/2 cup milk or so, 1/2 cup shredded cheese (I used cheddar and pepper jack), salt and pepper, and I added some dried herbs like marjoram and thyme as well. I had a bit of sour cream left too, so I threw that into the mix for good measure.
After forming your pie crust in your pie pan, add your cooked vegetables, then add the egg mixture. Bake at 350 degrees F for about 40 minutes, or until eggs are set.
Veggie Burgers and sweet potato fries
Veggie burgers used to be something I only ordered at restaurants, but if you learn to make your own, you'll be glad you did! These veggie burgers have black beans and kidney beans, and that special something to hold them together - sweet potatoes! I made 4 veggie burgers and froze two of them for another night. I used dried beans again, but canned beans work just fine.
1 can black beans, rinsed and drained
1 can kidney beans, rinsed and drained
1 medium sweet potato, diced small
1/2 red onion, minced
salt and pepper to taste
cumin
garlic and onion powder
Add the diced sweet potato to a pot of water, bring to a boil, then simmer until sweet potato is very soft. Add beans before sweet potato is cooked through. Once sweet potato is thoroughly cooked, drain water. Add seasonings and minced red onion. Mash with a potato masher or wooden spoon until the mixture comes together. Form into burger patties. Wrap in plastic wrap and freeze until firm.
Sweet potato fries are even more simple. Don't bother peeling them either! Simply cut several sweet potatoes into french fry length. Lay out flat on a baking sheet, add olive oil and salt and pepper. Roast in a 350 degree oven for about 50 minutes or so, stirring the fries several times while cooking. Season to taste again and enjoy! Better for you than deep frying and just as delicious.
American Pie
The best thing about pie, is the crust. It should be anyway. If you take the time to make a delcious flaky crust, you won't regret it. I made 4 pie crusts all at one time, used 2 of them for the pie, and froze the other two. Next time I have a craving to make something sweet, I'll already have the crust ready to go. Just thaw the frozen crust at room temperature. Here is a delicious pie crust recipe compliments of my mother-in-law, pie make extraordinaire, Kathy Beach:
3 cups all purpose flour
1 1/2 T sugar
1/2 tsp salt
1/2 tsp baking powder
1 cup shortening
1/4 cup butter (1/2 stick)
1 T. cider vinegar
1 egg
ice water (about 5 oz)
In a large bowl, mix dry ingredients. Add in shortening and sliced butter and mix with a pastry cutter and finish with fingers until mixture resembles small peas.
Stir together egg and cider vinegar. Add enough ice water to make approximately 6 oz. Make a well in center of dough mixture. Add most of the liquid all at once and stir quickly and gently with fork until just incorporated. Add more liquid if not holding together, but not too much or it will be sticky. Do not over mix.
Form into 4 disks. Wrap with seran wrap and chill.
Gently roll into pie shells ,using plenty of flour.
Disks can also be frozen well covered. Thaw at room temperature.
For the apple pie, I used an assortment of apples from the Farmer's market. I added lemon juice (to keep the apples from turning brown), cinnamon, sugar and nutmeg.
For the egg wash, I used an egg yolk and heavy cream.
I baked the apple pie at 400 degrees F for 20 minutes, then at 350 degrees for another 40 minutes.
We enjoyed it with some homemade cinnamon vanilla ice cream and friends!
Monday, February 22, 2010
Blackbean and sweet potato chili
Nothing beats coming home and smelling chili that's been simmering in the crockpot all day! I like to use dried bean (more bange for your buck) that I soak overnight, then add it to my crockpot in the morning to simmer with tomatoes, peppers, onions, spices and this time sweet potatoes! I used sweet potatoes to give the chili more substance, especially because I didn't use any fresh peppers (it's February people!).
1/4 pound dried black beans, rinsed, sorted, and soaked
1/4 pound dried kidney beans, rinsed, sorted, and soaked
1 medium onion, diced
1 medium sweet potato, diced (I don't even peel it, that's where all your nutrients are!)
2 cans organic diced tomatoes with green chilis
2 garlic cloves, minced
cumin
chili powder
salt and pepper
garlic and onion powder
Simply saute garlic and onion until soft, combine it with the rest of the ingredients, season to taste and let the crock pot work its magic! I always rinse out the canned tomatoes and add the water to the pot. A dollop of daisy make it even better!
Comfort food
There are many foods I think of when I hear "comfort foods", but some of my favorites are homemade macaroni and cheese and baked beans! Believe it or not, these two comfort foods taste delicious together! Throw in some sauteed green leafy vegetables and it's really a delicious and somewhat nutritious meal!
I was inspired to make homemade macaroni and cheese after our annual African American History meal at work. This year, instead of using a pre-made macaroni and cheese product that comes frozen and with loads of preservatives and sodium amongst other things, we need it from scratch! I made it from scratch at one of my schools actually, because my cook called out sick that day. Turns out, making it for 300 kids isn't all that different than making it from me and Rob at home!
Homemade mac and cheese goodness:
For 6 large servings I used
3/4 pound of whole wheat macaroni (look for the package with the fewest ingredients!)
shredded cheddar
shredded parmesan cheese
milk
I also used some pepper jack cheese for good measure
salt and pepper to taste
Boil your macaroni in salted water, drain, pour into baking dish you will be using. Add milk until you can see it through the macaroni at the bottom of the pan, add as much shredded cheese as your stomach can handle, stir, cover and bake for about 40 minutes. Remove from oven, stir again, top with even more shredded cheddar and bake uncovered for another 10 minutes. Enjoy!
Mom's baked bean recipe:
1 small onion, diced
1/2 tablespoon butter *or use diced bacon and omit the butter
1 14 oz can red kidney beans, undrained (or use dried beans and cook them 1st)
ketchup
mustard
brown sugar
Worcestershire sauce
Tabasco
salt and pepper
garlic and onion powder
Saute the diced onion in butter (or bacon fat, yum!)
Combine baked beans with cooked onions in a small baking dish
Add remaining ingredients, stir well, cover and bake for about 30 minutes
Amounts for the bbq sauce ingredients vary, if you like saucy beans (who doesn't like saucy beans?) add more or less ketchup, the remaining ingredients are just add more flavor to the sauce. Feel free to taste as you add the seasonings to figure out what you like. Add some cayenne pepper for a little more spice too!
Friday, February 19, 2010
Monday, February 15, 2010
Homemade Bagels...omg!
Living in NYC means that I've fallen in love with bagels. At least once a week I get a craving for a delicious chewy NY bagel. Today, I made bagels for the first time and now I have a freezer full of bagels ready to eat...uh oh. They are sooo good! I had a bit of hard time sealing the edge, I think it's because the dough was a little dried out in places. While you let the dough rise, you are supposed to cover the bowl with oiled plastic wrap, but I just used a towel, so the top of the dough got a little too dry. Next time they will look a little prettier, but at least I got the taste and texture down! For the seeds on top, I didn't have any fennel seeds, but I did use a combination of coarse salt, poppy seeds, sesame seeds, a couple mustard seeds, and caraway seeds. The combination is delicious! I also used bread flour for this recipe instead of all-purpose, I think it helped the bagels reach their full deliciousness potential.
Valentine's Day Dinner
As much as I enjoy going out to dinner, sometimes I'm disappointed. I end up thinking, I could have made this at home for half the price...so instead of being let down this Valentine's Day, I went all out and made dinner for Rob and I and it turned out great!
The menu: Fried calamari for an appetizer, filet mignon (steaks came from Maple Avenue Farms, where I used to work) with a mushroom red wine sauce (mushrooms from Rexcroft Farms at the ft. greene farmer's market), sauteed spinach and roasted red potatoes (also from the market). For dessert, we hade some more Brooklyn blackout cake with some homemade ice cream! We totally indulged!
Sunday, February 14, 2010
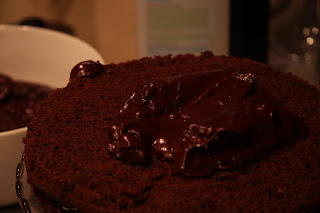
Brooklyn Blackout cake!
I found this recipe online, but first heard about it through the grapevine from some Brooklynites at work. Evidently there was a bakery called Ebinger's that used to to make this cake, but it's no longer around. I'm sure a bakery somewhere in Brooklyn still makes this cake though, or at least they should! I made it for Valentine's day, but made it the day before v-day and shared it with some friends. Here's the recipe from
http://www.recipelink.com/cookbooks/1999/0609604201_2.html
-
8 tablespoons (I stick) unsalted butter, softened
-
1/4 cup vegetable shortening
-
2 cups sugar
-
3 eggs
-
2 teaspoons pure vanilla extract
-
3/4 cup cocoa powder, preferably Dutch-process
-
1 teaspoon baking powder
-
1 teaspoon baking soda
-
1/2 teaspoon salt
-
2 1/4 cups cake flour
-
1 cup milk
-
FOR THE CUSTARD
-
3 cups water
-
2 1/2 cups sugar
-
1 tablespoon corn syrup
-
1 1/2 cups cocoa powder, preferably Dutch process
-
Scant 2/3 cup cornstarch
-
6 tablespoons unsalted butter, cut into pieces
-
1/2 teaspoon pure vanilla extract
Heat the oven to 375 degrees F. Butter and flour two 9-inch round cake pans. Cut 2 circles of parchment paper or wax paper to fit the bottoms of the pans, then press them in.
MAKE THE CAKE
-
Cream the butter and shortening together in a mixer fitted with a whisk attachment (or using a hand mixer). Add the sugar and mix until light and fluffy. Add the eggs one at a time, mixing after each addition. With the mixer running at low speed, add the vanilla, cocoa, baking powder, baking soda, and salt and mix. With the mixer running at low speed, add about a third of the cake flour, then about a third of the milk, and mix. Repeat with the remaining cake flour and milk and mix.
-
Pour into the pans and bake until dry and springy to the touch and a tester inserted into the center comes out clean (a few crumbs are okay), 30 to 35 minutes. Let cool in the pans for 15 minutes, then turn out onto wire racks and let cool completely, to room temperature.
-
Using a long serrated knife, cut the cake layers horizontally in half. Reserve 3 halves for the finished cake and put the remaining half in a food processor, breaking it up with your hands. Pulse into fine crumbs.
MEANWHILE, MAKE THE CUSTARD
-
Pour 2 1/2 cups of the water, the sugar, corn syrup, and cocoa powder into a large saucepan and bring to a boil over medium high heat, whisking occasionally. Dissolve the cornstarch in 1/2 cup of water. Whisk into the cocoa mixture in the saucepan and return the mixture to a boil, whisking constantly. Cook, whisking constantly, until very thick, 3 to 4 minutes. Remove from the heat and stir in the butter and vanilla. Pour into a bowl. Cover with plastic wrap, lightly pressing the plastic against the surface to prevent a skin from forming. Chill until firm, about 45 minutes
FINISH THE CAKE
-
To finish the cake, place a cake layer on a cake plate or serving platter (reserving the most even layer for the top) and spread with cooled custard. Top with another layer of cake, then custard, then one more layer of cake. Cover the top and sides of the cake with the remaining custard. Coat the cake with the cake crumbs. Chill until ready to serve, at least 2 hours. Serve the same day.
Wednesday, February 10, 2010
What's in season in February? Cabbage!!
Cabbage is actually a year round vegetable, but during the winter months when the farmer's market is pretty bare besides potatoes, onions and carrots, cabbage is nice a perk to find. I bought one cabbage for $3 at the market and so far I've used it to make cold noodles with peanut sauce, cole slaw, and stir fry and I still have over half it left! That thing was huge!
The recipe I used for the cold noodles with peanut sauce, pictured here came from the Insitute of Culinary Excellence (ICE) in Manhattan. Last summer I got to attend a 2 day workshop, it was just like being back in culinary school! The peanut sauce is very simple to make and you can use whatever vegetables are in season at the time. I only used cabbage and carrots, but during the summer, cucumbers, red peppers and zucchini are great additions.
Peanut sauce:
1 cup peanut butter
2 garlic cloves
1 jalapeno - seeds discarded (I used dried red pepper flakes instead)
1/4 cup lime juice
1/4 cup lemon juice (I used orange juice instead, it's what I had on hand!)
1 teaspoon salt
1/2 teaspoon ground black pepper
For the spaghetti and vegetables:
1 pound spaghetti (I used the leftover from what I made from scratch yesterday)
2 tablespoons vegetable oil
1 large carrot - peeled and cut julienne
2 cucumbers - peeled and cut julienne
1 red pepper, seeded and cut julienne
1 medium zucchini - cut julienne
1 small head white cabbage - shredded or sliced very thin (I sent mine through the food processor)
6 scallions - roots trimmed and discarded (I omitted the scallions and through in cilantro instead, do you what you like!
Cook the spaghetti, rinse under cold water to cool, and drain. Toss the spaghetti in 2 T. oil. Toss the spaghetti with whatever vegetables you decides to use.
To make the peanut sauce, place all ingredients in a food processor or blender, and process till smooth. Add water if it's too thick.
Toss spaghetti and vegetables with the peanut sauce to coat. Serve room temperature or cold.
Enjoy!
Tuesday, February 9, 2010
Spaghetti alla Puttanesca
Fancy name for a simple pasta dish that roughly translates to "whore spaghetti", or garbage spaghetti. Rumor has it that a chef created it one night at his restaurant because he was running out of food. This can happen at home too, when you want a good meal, but don't want to walk 1 1/2 blocks to the grocery store, or its the end of the week and your farmer's market supply of vegetables has dwindled. Neither was the case last night exactly, I just wanted to make homemade spaghetti with the pasta maker Rob gave me for my birthday last summer and I had some olives. There are only a few ingredients to make the sauce:
A couple of cloves of garlic, minced
Olives, diced
Anchovies ( I actually didn't use them last night, but I have before)
Fresh tomatoes (Used canned whole tomatoes last night instead, it is February after all)
Salt and pepper to taste
You can also add capers and chili peppers if you'd like. I used one small onion as well.
Saute garlic and onions in olive oil. Add your tomatoes and simmer for about 20 minutes. I used canned whole tomatoes, so I broke the tomatoes up with a wooden spoon. Add olives and anchovies if using. Season lightly with salt and pepper. Dish will already be pretty salty from the olives and anchovies. Serve over spaghetti cooked al dente and enjoy!
It's a quick and tasty sauce to make, best served over homemade spaghetti!
Monday, February 8, 2010
Superbowl Pizza!
Pizza Dough
INGREDIENTS
• 2 1/4 teaspoons active dry yeast (1 package)
• 1/2 teaspoon brown sugar
• 1 1/2 cups warm water (110 degrees F/45 degrees C)
• 1 teaspoon salt
• 2 tablespoons olive oil (or veggie oil (rises a little more))
• 3 1/3 cups all-purpose flour
DIRECTIONS
1. In a large bowl, dissolve the yeast and brown sugar in the water, and let sit for 10 minutes.
2. Stir the salt and oil into the yeast solution. Mix in 2 1/2 cups of the flour.
3. Turn dough out onto a clean, well floured surface, and knead in more flour until the dough is no longer sticky. Place the dough into a well oiled bowl, and cover with a cloth. Let the dough rise until double; this should take about 1 hour. Punch down the dough, and form a tight ball. Allow the dough to relax for a minute before rolling out. Use for your favorite pizza recipe.
4. Preheat oven to 425 degrees F (220 degrees C). If you are baking the dough on a pizza stone, you may place your toppings on the dough, and bake immediately. If you are baking your pizza in a pan, lightly oil the pan, and let the dough rise for 15 or 20 minutes before topping and baking it.
5. Bake pizza in preheated oven, until the cheese and crust are golden brown, about 15 to 20 minutes.
I also made a few breadsticks from the dough. They were delicious too, especially dipped in Melissa Funkey's cheese dip recipe that I'm going to make and post on here one of these day's too!
I'm not happy about the outcome of the Superbowl, but I enjoyed the pizza!